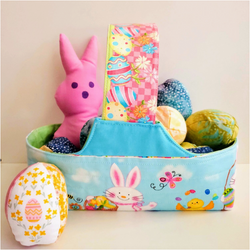
DIY Fabric Easter Basket
18th Feb 2021
Mother Nature has sent a strong reminder that February is supposed to be cold and snowy! Most of the US endured a week of snow and sub zero temperatures feeling the wrath of the Polar Vortex. Enough of winter! I am ready to focus on spring sewing projects starting with this Easter basket. This would be a great basket to make for the kids or for seasonal decor this spring. I had fun fussy cutting the fabric found in the Easter Mystery fat quarter bundle to make this cute basket. The Classic subscription box this month provided some pretty pastels featured in this fussy cut egg. Retro Mama has a great free pattern and tutorial to make these kid safe reusable eggs. The classic marshmallow bunny “Peep” completes the basket.

Materials needed
-
Assorted Fat quarters
-
Fusible interfacing and/or batting for basket
-
Coordinating Aurifil thread from Chroma subscription
-
Poly-Fil to stuff eggs and bunny
-
Pattern for basket from Diary of a Quilter Amy Smart
-
Pattern for “Peep” bunny from Maggie Muggins Designs
To get started print and cut out the pattern pieces. I wanted to fussy cut the fabric for the basket so I had to add a solid blue to the top of each side to complete the fabric piece. For the lining I used a fat quarter of Ombre Fairy Dust Mint with Pellon fusible 808 interfacing. For the handle cut 2 ½” x 16” pieces one of lining and one of the top fabric fusing the interfacing to the lining fabric. All seams will be ¼” for this project.

Before starting to sew the pieces together you may decide to add some batting to the outside pieces of the basket. This is optional, but sew just one side seam creating one long piece then using the walking foot quilt straight lines about an inch apart.

With the right sides together sew the side seams and bottom of the basket for the exterior fabric and lining. To create the box corners bring the two edges of the notched corners together and sew back tacking at the start and end of the seam

I find that if you take the time to press the shape of the inside of the basket at this point it is easier to keep the shape in place as you sew it to the exterior.

I also like to place the lining in place with the exterior to align the edges before I sew the seam. I do some trimming so that the lining edge stays on the inside after the final seam and it is turned right side out. It is also helpful to align the curve as seen here. Be sure the exterior is pressed nicely giving attention to the shape of the basket.

On the top edge where the handles will be attached you need to press ¼” down towards the wrong side. Now with right sides together place the exterior of the basket so that it is nestled into the lining piece aligning the side seams. You may want to pin to keep it in place as you sew ¼” around the top edge. Be sure to leave the opening on each side for the handle to attach. Trim and notch the inner curved seams.

Carefully turn right sides out through one of the handle openings. If you have really thick fabric or if you prefer more space to turn the piece you can leave one of the bottom side seams open in the lining top stitching it closed later. It is really important to take the time to seam iron the edges of the basket for proper alignment along the top edge. To prepare the handle, sew the right sides together on the long sides and turn the right sides out. Press and topstitch ⅛” from the edge with coordinating thread. Insert the end of the handle into the opening on each side of the basket at least an inch and pin in place.

Topstitch ⅛” from the edge all along the top of the basket securing the handle in place as you sew. Give it a final press and you are finished!
The bunny “Peep” is very quick to sew. With right sides together sew a ¼’ seam leaving an opening at the bottom to turn. Using Pinking shears around the curves will help it lay flat.

Turn the right sides out and press. I used a Frixion pen to mark the eyes and mouth so that I could change it easily with the heat of the iron if the placement was wrong. I used a Stained Sharpie marker for the permanent eyes and mouth.

Stuff with the Fiber-Fil and machine or hand sew the bottom closed. He is ready for the Easter basket! I filled the basket with a dozen fabric eggs made from the Opal color way from the 2021 Spring “Sparkle and Shine” Puzzel Mystery quilt. You can sign up for Snippet to get a bag of scrap fabrics perfect for making some fabric eggs to go with the basket.


